Usually when I set out to do an exhaust system, I go thru all my old exhaust pipes for bends to add to straight sections of new material, or I order mandral bends and use all new pipe. If it's all new pipe, it usually goes pretty well, but if there are used sections to weld in, no matter how clean you think you get the pipes, the carbon in the pipes always fucks with your welding, especially if you are TIG-ing everything together. Plus, you have to run around or order your materials, and wait for it to come in.
I thought this time, for the pipes we're doing for Tommy's 113 ci S&S Evo, that I'd try one of Biltwell's exhaust pipe kits, and see exactly how much time, money, and materials I could save over the way I usually do it, and how well a kit with "pre-selected" sections would "fit in" in a strictly custom designed system.
Also, I'm going to show you a little of what I did to Tommy's frame, too. Tommy had a softail-style RHD frame for a 300 tire, and he didn't want a tire that wide anymore. He was going to buy a new frame, but I talked him into letting me narrow his frame down so he could run a 180/200 tire with LH chain drive.
 Here's what you'll get in kit for $165.00 - you'll get a lot of tubing for the money. Tommy also wanted to use a set of the Biltwell aluminum bell tips to finish the ends of the pipes (check out the Biltwell site for a full description on their pipe kits).
The kit is filled with some quality tubing, very little seam on the inside, and a true 16ga wall - no thick and thin sections. Also, the mandral bends are very uniform thru the radius, and the radiuses and the straight sections match up great. No real difference in tubing diameter between the straight sections and the bends, and that makes for a nice visual run when you're finished.
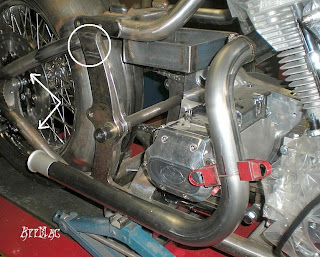
 So, here's the rear pipe run we finally came up with. Tommy wanted something similar in looks to the rear pipe on a set of Panhead "in front of the trans" drag pipes. By judicious measuring, and carefully cutting, I was able to get both these bends out of one of the kit's larger radius pipe sections. As it looks now (and I don't fuck up!), there will be enough pipe left over to get a really good start on another set of pipes out of what'll be left over when I'm finished. We'll see.
Also, in this picture, you can see from the arrows where I had to splice in new frame tubing to mate up the right axle block to the swing section, to get rid of the RHD offsets. The rear swingarm section now fits a 180/200 tire with LHD chain. And, in the circle, you can see where I cut out the big RHD offset out of the upright, and spliced in a 1 1/2" high x 1/2" thick flat filler plate to take it's place.
 In this picture, you can see how nicely the OD of the tubing sections mate up. The arrows show where I had to take the 4" dogleg out of the frame where the offset was for the RHD. When we get the front run finished, I'll post a photo with both pipes in their final layout
What did I find that I didn't like about the kit? Well.....if I was designing the kit, I'd drop the little fishtail ends out, and come up on that straight section of tubing 5", and put a 45 degree bend in each pipe instead. Why? Because there aren't any 45 degree bends in the kit, and I think people would rather have a couple 45's than the fishtails, especially if you were doing a pair of upsweeps. For example, a 45 degree bend section would be the perfect angle for bottom upsweep runs. Also, if you used the 45's in the headpipes, you could tuck them closer into the lower frame if you wanted, as another example.


No comments:
Post a Comment