Thursday, May 16, 2013

Love client photographs like these.....

Sometimes when I do work for clients, I never see the end results of their projects, and that's OK. Other times I get to see where my modifications fitted in on the finished bike. Shawn just sent me a couple of photos of his finished bike, but first.....
This is what Shawn brought me to start with - a Chassis Design Co. "Bling Cycles" drop-seat frame. Shawn had a couple roadblocks to get around to use this frame in his next build. First, he didn't have enough ground clearance, and  second, he needed room for his 135" Evo stroker motor that was being assembled.

So I cut the frame in half, raised the entire backbone 1 1/2", took the deep drop seat section out of the back, and shortened the entire rear section 2" while I was at it. I also put a pocket into back of the transmission plate to tuck in a 16 cell Antigravity battery.
Here's the roller I turned over to Shawn. No, Shawn isn't disappointed, it was just a cold-ass day, with a snow storm blowing  in on the horizion. Plus, Shawn wanted to load up and head out....can you blame him?

Before it left here, I aligned the drivetrain for him, relocated/remounted his CDC oil tank,  made the mounts for his 5 gal. fatbobs, set the rear fender and seat, fabbed the sissy bar, and made one of my "Heavyweight Champ" tail light/license plate frames.
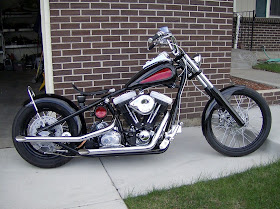
Shawn took his roller home, and this is how the bike finished off. It's a killer fatbob with a great stance, and Shawn did a fantastic job on completing the bike. The fit & finish is top shelf. The paintwork is another class job from Motorsport Concepts here in town. Same shop that did Lumpy's CFL, from below. Motorsport Concepts also has Deb's rear fender right now color-matching it to her tanks, you'll see the rest of her final put-together coming up real soon on here as well.
In this shot you can see the sissy bar, and my "Heavyweight Champ" tail light/license plat mount. The 135"er has plenty of room to slide in and out now, but the dimensions aren't "over the top" to do it.

Shawn has another frame that you might remember me doing for him at the time I modified this one - that's the Shovel 4speed swingarm frame I filtted the Evo motor into, along with the matching Softail 5 speed trans & primary. I 'm looking forward to seeing that completed as well. Thanks for the final photos, Shawn, I appreciate it. Job well done!

Thursday, May 9, 2013

We need a couple of these.....

OK, myself and Part-timer Steve need two good OEM INLINE rear spring perches. BT or 45 OK. The rest of the leg can be bent, mangled, stem cut out, etc. As long as the spring perch itself and above is good. Email me at: irishrich@shamrockfabrication.com


Monday, April 29, 2013

Lumpy's chrome showed up Friday......

......so we wasted no time assembling his springer, and getting the bike up on its own two wheels.
The wiring is finished, and all systems are GO! Kinda like a blivit. What's a blivit? 10 pounds of shit, in an 8 pound bag....it all fit, though, with enough space left to do his electric speedometer hookup.
Now, if I can figure out the pesky hydraulic clutch setup, we're all finished. I suspect a hung-up puck in the cover. Before I installed the cover, I took the puck out, lubed the bore, puck, and O rings with DOT 5, to avoid this. We'll see on Tuesday, I'm swapping trans and rear sprockets for Kyle tomorrow.

Friday, April 19, 2013

And, Lumpy's bike, too.....

Lumpy's bike is just about done, too. We're waiting on his chrome - namely his top motor mount, and his front fork for his springer.....
Lumpy's sissy bar. I thought chrome, but Lumpy went with the same 80% gloss black as his frame is. Good call on his part. The sheetmetal is gloss black, with maroon 'flake panels, with a lot of different goldtone flakes mixed in, silver pinstripes. Motorsport Concepts did the spritz...
The cover I did for his electrical compartment. A little flash under the seat......
And....here's where we sit, waiting on the chrome front fork, so I can put his springer together. Check out the seat - I hammered out the seatpan, then the Haifley Bros. did the upholstery. They killed it....I can't wait to get this bike out in the sun, the paint just doesn't come through in the photos.

Deb's bike is doing well......

Deb's bike is going back together. Almost all of the bike is finished, save for color-matching her rear fender to her tanks, and some powdercoating of her front end parts.......


Sunday, March 17, 2013

Happy St. Patrick's Day!

And, Happy Birthday to me as well. 


Wednesday, February 27, 2013

Shawn's "other" roller, and....someone returned my camera!

I can post up these photos of Shaw's "other" roller that  I was completing simultaneously with his 4 speed frame project. I'm able to do this because someone found my camera! If you remember from before, when Shawn picked up his roller last Saturday, I shot these photos below, then sat the camera down on the trunk of the OL's car. She was running late for work, and took off while we were loading Shawn's roller up......with the camera still on the trunk!

Someone from the neighborhood found the camera in the intersection by our place (must have been right after it slid off, because I re-traced her work drive route), looked at the photos, recognized the house, the Russian Olive tree, and my truck. He told his wife "Hey, I know who owns this, the guy that builds those cool bikes!". He dropped the camera off today, and wouldn't take anything for returning it, just a handshake. Wadda guy! Restores my faith in my fellow man. Thank you very much.

Anyways, here's Shawn posing with the completed roller. He doesn't look pleased, but, he was stoked. It was just COLD!, then it snowed a few inches again that night. This is the Chassis Design Co. "Bling Cycles" frame I raised the backbone up 1", took the entire drop seat frame section out of, then shortened up the whole rear section about 2 1/2". The backbone had to raise up to fit Shawn's 130 cu.in. Evo elephant motor.....
Here's the sissy bar for the bike. Shawn wanted just a shortie, and I carried the fender's crowned shape up into the top of the bar, and added my trademark "bungy-bar" above the fender, too. I think the bar has a really nice shape. I bend every one of my sissy bars free-hand, no jigs or patterns.
I also fabbed up one of my "Heavyweight Champion" tail light/license plate mounts for him, with a lighted LED plate frame. I sell these in various steps of completion, and I'm taking orders, so....

I call it the "Heavyweight Champion" plate mount, because if you'll recall, Wade went down at 50 mph, and skidded on an exact match of Shawn's plate mount for over 40 ft., and the thing never budged - it kept that side of his bike up and off of Wade all the way until he stopped.
Here's a couple of photos Shawn sent a few days ago, of where he's at on his mock-up. As you can see, no problem sliding the elephant motor into the frame now. Shawn also has plenty of room between his starter motor and the bottom of the oil tank, another clearance problem area before.
38 degree rake, 3 degree trees, and 4 over tubes. I'm diggin' the stance.
Man, will you look at the size of those cylinders??? Also check out the 16 cell Antigravity battery that I notched into the back of the transmission plate area. 1/2 the size of a comparable Deka Softail-application battery, 1/3 the weight, and 480 cold cranking amps! The Deka would be around 320 cca. With the compression releases, no worries starting this motor. Fab Kevin tested, and approved!

Sunday, February 24, 2013

Shawn sent some mock-up photos......

I love when I get photos like these. I want to see what my work looks like after it leaves here. Remember this 4 speed frame we stretched to take an Evo, and a Softail 5 speed?
Well, Shawn sent me some photos of his mock-up so far with the frame. Looks pretty good, I think. 
Really like the lines of the Shovel-era 'glass bags, and the FL fender. Classic.
Oh, and I had photos of Shawn's other completed roller from the post below, when it left this morning. That's not the only thing that left this morning, either.......after I finished taking the photos, I set the camera on the OL's trunk, and it left with her when she went to work. It's someplace between here and Louisville.Time for a new camera....fuck.

Wednesday, February 20, 2013

You probably wonder where I've been.......

Well, I've been busy as hell. Found most of the parts to rebuild my Road Glide (now renamed The Deer Glide), now if I only had time to tear it down so I can cut the neck off, and send it to H-D to get a new frame! I'm also looking for a nice set of '86-'99 Timkin tapered bearing H-D Factory bagger mag wheels.

Also got my single-looper CFL torn down so I can finish the welds I couldn't get to, and to make a few additions - like the ports in the frame rails to run my hydraulic clutch line internally, for one. Then, the frame is off for nickel plating, and the tins off to Kirk Taylor at Custom Design Studios for paint. Kirk is gonna kill this paint job, I ain't lettin' the cat out of the bag on it until it's done.

Broke everything down on Lumpy's CFL, and it's out to paint, plating, polishing, and powdercoating. Hoping for a 3 week turnaround on all the parts (yeah right!). Deb has some $$$ on the way, so we'll be rolling on her bike again mucho queeko. Also got a call from a guy that has a Ryan Boyd bike that needs to be taken to completion on the fab and fittments. Wants to ride it to Laughlin for the River Run. He says he'll be here Saturday "....if the weather is good". Right now it's snowing, so..........

Brad from Silver City, NM is coming up on Friday to pick up his frame I worked over, and he's also picking up his fresh Pan rebuild from Deluxe Motorcycles as well. Brad will be a busy guy when he gets home! I'm still gathering parts and working on Tommy's Evo and Softail transmission in a 4 speed swingarm frame when we can, too.
Which brings us to this one - Shawn's frame. This is the Chassis Design Co. "Bling Cycles"-style frame that I took the drop seat frame section out of, raised the backbone 1", and shortened up the ass-end 2 1/2". All I have left on it, is to make his sissy bar tomorrow, and install his front end. It'll roll out of here on Saturday, if Shawn's back from SoCal. I need some room! I need a ham sandwich and curly fries! I need a vacation! 
Plus, last week Shawn took home the completed Santee 4 speed swingarm frame that we stretched and fitted up for his son's Evo/Softail 6 speed, the one from a couple posts back. Whew!

Monday, February 4, 2013

The Troggs' Reg Presley dies at 71.....

In honor of ol' Reg.....one of the greatest movie entrances ever......WILD THING!

Saturday, February 2, 2013

What did Phil say???

Punxsutawney Phil came out, and said "Early Spring". Allright Phil! Let Spring Fever commence!

Wednesday, January 30, 2013

Norm Grabowski article......

Not part of the article below, but the back cover of the Defrance & Defrance (D&D Cycles) catalog, circa 1969. Just thought I'd throw this in....


Friday, January 25, 2013

Shawn keeps bringing me frames!

I love it! This is the 3rd frame I've modified for Shawn. The first one was for his son's project, then I just finished up Shawn's frame for his build, now I'm doing this frame for another son's project. "The family that builds & rides together, abides together", or something like that.....
Here's where we started - a Santee 4 speed swingarm frame, with a 32 degree rake, and a 2" stretch in the downtubes from the factory. Shawn wanted more "up" in the downtubes (he asked for about another 2"), not much out on the neck, and wanted to keep the fatbob mounts intact, and retain the 32 degree rake. OK, we can do that!
Two decisive(?) surgical cuts, and no turning back now......
Part-timer Steve getting with the prep work. It isn't the welding that consumes the shop time, it's the cutting, grinding, fitting, drilling plug weld holes, making sleeves, cleaning the tubing outside and inside.....then the fitting, squaring, trimming. It's like paintwork, your finish is dependent on the time you spend on your prep work, framework is no different.....
Originally, we were going to stretch the downtubes another 2", but after we got it "assembled", with keeping the original 32 degree rake, 2 more inches looked waaaay too cartooney. So, off with the 2" tubing sections,    some 1" tubing replacing those, and bingo! Just right. Now, how to connect the backbone? Most times when guys do this, they just join it at a "hard" angle back to the seatpost. We're going to try a junction I've wanted to do for a long time, but more work......
All the parts prepped & modified, and ready to assemble......again!
Ready to jig it up for the ump-teenth time, and do the final welding. Everything has stayed square up to now, I want to keep it that way. I think the backbone junction went great. Strong, but it "flows" into the seat area, not a "hard angle" junction, and nicely with a little seat area tubing realignment if I do say so myself.  And, I do!
Here's how the backbone looks from another angle, I'm happy, Part-timer Steve is happy. Shawn hasn't see this yet, but I'm pretty sure he'll dig it, too.

Saturday, January 19, 2013

Deb said......

"I want some Wild Angels upswept fishtails, a tall sissy bar, some fatbob tanks, med. rise ape hangers, a big-ass S&S engine, a Baker 6 in a 4, a 6 quart oil tank with domed ends, a hardtail with OEM axle plates, and I want....."
Well Deb, we're getting there......

Wednesday, January 16, 2013

Some spare time, so.....

Seems like every part I order is on intergalactic backorder, so while we wait on the parts that are supposed to be here tomorrow and Friday...... 
Part-timer Steve and I pulled the Shovel out of my project, and fitted those georgeous finned rockerboxes from Throwback Motorcycles on today. These are some special boxes to me, they carry "0001" for the production number. That means these were the first set out the door.
We dropped the bare boxes onto the studs, and like I thought might be the case, we had a little internal interference with the valve spring collars on the inside walls of the castings. These box castings are beefy, so a little work with the die grinder gave us the right amount of clearance. Zip-zip, they dropped right into place.

I also need to say, that because my set were "0001", you won't have to do this, as Josh has informed me that  they come with that little bit of additional clearance machined into them now from Throwback,  and they're ready for you to drop right on.
The heads also received a Cera-cote "fresh blast" coating, and a fresh 3 angle valve job. Not a bad looking 86" motor, huh? 
Now, if Colony will only ship all my hardware for the rockerboxes......
Throwback Cycles also has a nice cast "bird deflector" available, that matches their finned rocker boxes to a "T". I'm going to use a NOS Custom Cycle Engineering finned teardrop deflector, that came from Randy before he passed on.